|
<< Click to Display Table of Contents >> Gully locator |
  
|
|
<< Click to Display Table of Contents >> Gully locator |
|
Purposes
Starting with 3D Polylines representing thresholds or channel lines :-

The cyan ? represents the gully location
To calculate the suitable level of a gully at a specified location to meet gradient requirements.
To locate the best location and level for a gully within a defined area.
To report gradients to an existing or proposed gully with a known level.
Operation
Select one or more 3D Polylines.
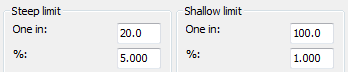
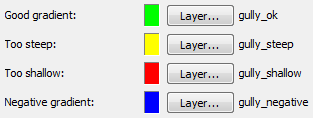
Confirm that steep and shallow gradients are set to suitable values, colours and layers.

Settings to calculate gradient lines to the gully location at every vertex and 0.500 metre intervals along the the 3D Polylines
Click the OK button and pick the plan location of the gully and the results are displayed :-
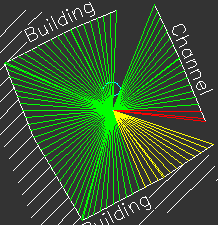
31.900 81%: Mark gully/New location/Autolocate/Show details/Up/Down/<eXit>:
In the above example a level of 31.900 is suggested. Options to enter at the command line prompt :-
O to return to the main dialogue.
S to show the detailed results :-

M to mark the gully location with a block.
In addition to the level being marked there are five available gully blocks (or you can make you own) :-
gully_200x200 square
gully_300x300 square
gully_500x400 square
gully_d_200 circular
gully_d_300 circular
G to represent the gradient lines as 3D Polylines. A ground model may be created from this and contours drawn.
L To analyse a gully location with a known level.
N to pick a new plan location.
A Autolocate :-
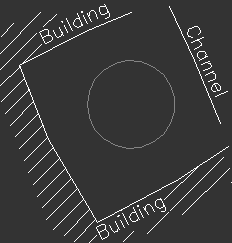
Prior to using this option a Circle or closed 2D Polyline needs to be drawn to define the area that the gully is intended to be located within.
Select the Circle or Polyline and press Enter to start Autolocating. Note that the gradient lines will be flashing during the calculation if "Show animation when Autolocating" is switched on. Keeping the animation on will slow things down a little but is more entertaining.
U to move the gully up by small increments (the colours of the gradient lines will change appropriately)
D to move the gully down by small increments (the colours of the gradient lines will change appropriately)
X to exit